 EVE卫浴
EVE卫浴
What Is a Glacier Bay Shower Valve Rough In — and How Do You Set It Up Right the First Time?
浏览次数:171 分类:Install
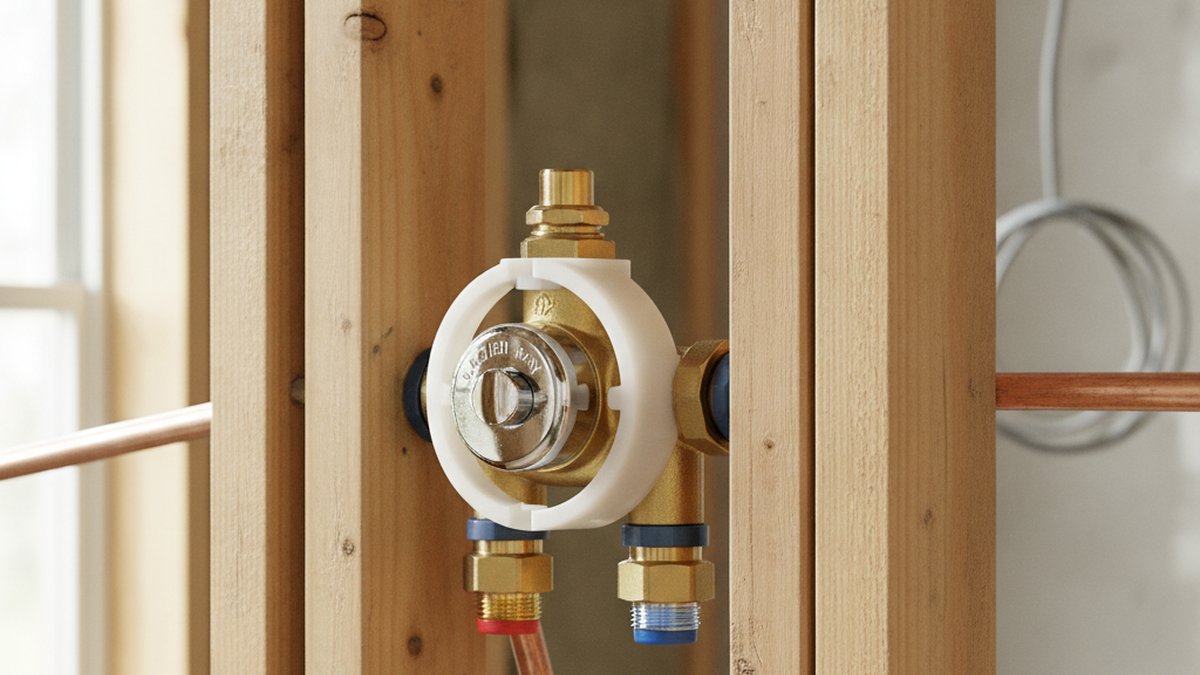
Getting the Glacier Bay shower valve rough in right is the single most important step in a shower install, because once the tile goes up, any mistake is buried behind cement board and thinset. The “rough-in” is the plumbing you do inside the wall — the valve body, the supply lines feeding it, and the outlets running up to your shower head and (sometimes) down to a tub spout. Do it well and the trim kit snaps on in twenty minutes. Get the depth or height wrong and you’re re-cutting tile or shimming a decorative plate to hide a gap. This guide walks you through the exact measurements, the fittings, and the mistakes people actually make.
What exactly is a shower valve “rough-in,” and why does it matter so much?
The rough-in is the in-wall stage of the job — everything you build before the wall is closed and tiled. It’s called “rough” because none of it shows; the finished, visible parts (the handle, trim plate, and shower arm) are the “trim” stage that comes later. For a Glacier Bay valve, the rough-in includes the brass or composite valve body, the four ports (hot inlet, cold inlet, shower outlet, tub outlet), and the plaster guard — that white plastic cap that protects the cartridge from debris and, crucially, tells you how deep to set the valve.
It matters because the valve’s depth in the wall is fixed once your backer board and tile go on. Glacier Bay valves, like most brands, are designed for a specific range of finished-wall thickness. The plaster guard is usually printed or molded with minimum and maximum depth marks. If the front face of your finished tile lands within that window, the trim plate covers everything cleanly. Land outside it, and the trim either won’t reach the wall or the handle won’t seat on the stem.
How high off the floor should you mount a Glacier Bay shower valve?
Mount the valve 45 to 48 inches above the finished floor for a standing shower, and 28 to 32 inches for a tub-and-shower combo where you also want a reachable spout. Those are the practical, comfortable numbers most plumbers use. The valve height is a comfort choice, not a code requirement, so adjust it to the people using the shower — a taller household might set a shower-only valve at 48″, while a family with kids leans toward 45″.
Here’s a quick reference for the standard heights in a typical rough-in. All measurements are from the finished floor, not the subfloor — remember to account for tile and mortar thickness (usually another 1/2″ to 3/4″).
| Component | Shower-only height | Tub/shower combo height |
|---|---|---|
| Valve body (center) | 45–48″ | 28–32″ |
| Shower head / arm | 78–80″ | 78–80″ |
| Tub spout | N/A | 4–6″ above tub rim |
| Hand shower bar (top) | 72–78″ | 72–78″ |
One easy mistake: setting the valve too low in a combo because you forgot the spout needs vertical clearance. If your tub deck is high or you’re using a deep soaking tub, bump the valve up so the spout still clears the rim with room to drop water freely. For more on getting that spout placement right, our guide on the right tub spout height above the tub covers the exact clearances.
What size supply lines and fittings does the rough-in take?
Glacier Bay shower valves use 1/2″ inlets for hot and cold, and a 1/2″ outlet for the shower riser — this is the residential standard in the U.S. You can feed the valve with copper, CPVC, or PEX; the valve doesn’t care about the material, only that the connection is leak-free and correctly sized. Most Glacier Bay valve bodies come with sweat (solder) connections, though some kits offer threaded or push-fit adapters.
Here’s what you’re working with at each port:
- Cold inlet (right side, facing the valve): 1/2″ — connects to your cold supply.
- Hot inlet (left side): 1/2″ — connects to your hot supply. Getting hot and cold reversed is one of the most common rough-in errors; double-check orientation before soldering.
- Shower outlet (top): 1/2″ — runs up the wall to the shower arm drop-ear elbow.
- Tub outlet (bottom): 1/2″ — runs down to the tub spout on combo units; capped off on shower-only installs.
If you’re going shower-only, you must cap the bottom (tub) port. Leaving it open sends water out the wall behind the tile — a slow, hidden disaster. Use a soldered cap or a threaded plug depending on your valve type, and pressure-test before closing the wall.
Do you need a pressure-balancing valve, and what does that change?
Yes — most Glacier Bay shower valves sold today are pressure-balancing (also called anti-scald), and this is now required by code in most U.S. jurisdictions for new shower installs. A pressure-balancing valve keeps the water temperature steady when someone flushes a toilet or runs the dishwasher, so you don’t get scalded by a sudden pressure drop on the cold side. For the rough-in, this doesn’t change your plumbing — you still run 1/2″ hot and cold — but it does mean the cartridge has a temperature limit stop you’ll set during the trim stage.
How deep should the valve sit in the wall so the trim fits?
Set the valve so the finished wall surface (tile face) lands within the depth marks molded on the plaster guard — typically about 1-3/4″ to 2-1/2″ of setback from the front of the studs. This is the number one thing people get wrong. The plaster guard isn’t packaging you throw away; it’s a depth gauge. Leave it on through the entire rough-in and tiling stage.
Think about your wall build-up: studs, then cement backer board (1/2″), then thinset mortar (roughly 1/8″), then tile (1/4″ to 3/8″). Add that up and make sure the valve’s finished-face window brackets that total. If the valve sits too deep, the trim escutcheon plate won’t reach the wall and you’ll see a shadow gap. Too shallow, and the plate stands proud or the handle won’t fully seat. When in doubt, dry-fit the actual trim plate against a scrap of your finished tile before you commit.
Glacier Bay valves usually include a mounting bracket or “mud guard” screw ears that let you fasten the body to a cross-brace between studs. Install a solid 2×4 or 2×6 blocking between the studs at valve height, screw the valve to it, and it won’t shift when you tighten fittings or when someone leans on the handle years later.
Can you replace a Glacier Bay valve without re-tiling the whole wall?
Often yes — if you’re swapping a like-for-like Glacier Bay valve or just the cartridge, you can usually work through the existing trim opening without touching tile. The trick is whether the new valve body’s footprint matches the hole already cut in your wall. Cartridge-only replacements are the easiest: you shut off the water, pull the trim, extract the old cartridge, and drop in a new one — no wall demolition at all.
Full valve-body replacement is harder. If the new body’s inlet spacing or outlet position differs, you may need to open the wall from behind (through an access panel or the adjoining closet) rather than through the tile. This is exactly why an access panel behind the valve is worth adding during any rough-in — it turns future repairs from a tile-cutting nightmare into a fifteen-minute job. If your issue is just a drip and not the valve itself, our walkthrough on replacing a single-handle faucet cartridge yourself shows the same cartridge principles that apply here.
What’s the step-by-step for a clean Glacier Bay shower valve rough-in?
The whole rough-in comes down to eight steps: brace, mount, connect, orient, run outlets, cap unused ports, pressure-test, then guard and close. Here’s the sequence in the order you actually do it:
- Install blocking. Screw a horizontal 2×4/2×6 between the studs at your chosen valve height.
- Mount the valve body to the blocking with the “UP” arrow (or top-marked shower outlet) pointing up. Check depth against the plaster guard now.
- Connect hot and cold — hot on the left, cold on the right (as you face the valve). Verify before soldering.
- Run the shower riser from the top outlet up to a drop-ear elbow secured at 78–80″ for the shower arm.
- Run or cap the tub port. Combo units run a drop to the spout nipple; shower-only installs get a soldered cap.
- Solder or connect all joints. Remove the cartridge before soldering copper directly to the valve to protect the rubber seals from heat.
- Pressure-test. Turn the water back on (with the cartridge reinstalled) and check every joint for weeping before closing the wall.
- Reinstall the plaster guard and leave it on through backer board and tile. Trim goes on last.
That “remove the cartridge before soldering” step trips up a lot of DIYers — torch heat cooks the internal O-rings and gives you a valve that drips from day one. Pull it, sweat your joints, let everything cool, then reinstall. The process isn’t wildly different across brands, so if you’ve done a Delta or Moen before, you’ll recognize the rhythm — see our comparison walkthroughs on installing a Delta shower valve trim kit and a Moen Graeden shower faucet for how the same steps play out on other systems. And if you’re doing a matching Glacier Bay tub filler as part of a combo, our guide on installing a Glacier Bay bathtub faucet yourself pairs naturally with this valve.
Glacier Bay vs. other shower valve brands: how do the rough-ins compare?
Glacier Bay valves rough in almost identically to Delta and Moen — same 1/2″ inlets, same pressure-balance concept — but there’s one big catch: trim compatibility is brand-specific. A Glacier Bay trim kit is designed for a Glacier Bay valve body, and you generally can’t mix a Moen trim onto a Glacier Bay rough-in. Plan your finish before you buy the valve.
| Brand | Inlet size | Pressure balance | Trim cross-compatibility | Typical price tier |
|---|---|---|---|---|
| Glacier Bay | 1/2″ | Yes | Glacier Bay trim only | Budget |
| Delta | 1/2″ | Yes (MultiChoice universal) | Same-brand, but universal body accepts many trims | Mid |
| Moen | 1/2″ | Yes (Posi-Temp) | Moen trim only | Mid |
Glacier Bay is Home Depot’s house brand, which makes replacement cartridges and trim easy to find locally and keeps the price low. The trade-off is that the ecosystem is smaller than Delta’s or Moen’s, so if you love swapping finishes every few years, a universal-body system like Delta’s MultiChoice gives you more freedom down the road. For a straightforward, budget-friendly install where you’ll leave the trim alone, Glacier Bay is a solid pick.
FAQ
What is the rough-in height for a Glacier Bay shower valve?
45–48 inches above the finished floor for a shower-only install, and 28–32 inches for a tub/shower combo. Measure from the finished floor (including tile), not the bare subfloor, and set the shower arm at 78–80 inches.
Are Glacier Bay shower valves 1/2 inch?
Yes. Glacier Bay shower valves use 1/2″ inlets for hot and cold and a 1/2″ shower outlet — the U.S. residential standard. You can connect them with copper, CPVC, or PEX using sweat, threaded, or push-fit adapters depending on your kit.
Do I need to remove the cartridge before soldering the valve?
Yes, always. Torch heat from soldering copper directly to the valve body will melt or degrade the cartridge’s rubber O-rings, causing leaks. Pull the cartridge, solder your joints, let the valve cool completely, then reinstall it.
Can I use a Glacier Bay trim kit on another brand’s valve?
No. Trim kits are brand- and often model-specific. A Glacier Bay trim is engineered to fit a Glacier Bay valve body’s stem, spline, and mounting pattern, so don’t plan to pair it with a Moen or Delta rough-in. Match the trim to the valve you install.
How do I know if I set the valve at the right depth in the wall?
Check the depth marks molded into the white plaster guard. The face of your finished tile should land between the minimum and maximum lines on the guard — usually about 1-3/4″ to 2-1/2″ of setback from the studs. Dry-fit the trim plate against a tile sample before closing the wall to confirm.
Should I add an access panel behind the shower valve?
If the wall behind the valve is accessible (a closet, hallway, or garage), yes — a small access panel turns future valve or cartridge repairs into a no-tile-cutting job. It’s optional but one of the smartest, cheapest upgrades you can make during a rough-in.
Final word from the bench
Author note: This guide was written by the evefaucet install team, drawing on years of hands-on shower valve installations and replacements across Glacier Bay, Delta, and Moen systems. At evefaucet we manufacture and test bathroom and kitchen fixtures to U.S. residential plumbing standards, and every valve recommendation here reflects real-world rough-in practice — not just spec sheets. Shower valves should always be installed to meet local plumbing code and the manufacturer’s pressure-balance (anti-scald) requirements; when in doubt, confirm your finished-wall depth against the plaster guard and keep your valve’s warranty documentation, since most Glacier Bay valves carry a limited lifetime warranty on the body and finish. If you’re pressure-testing and see any weeping at a joint, fix it before the tile goes up — that’s the whole point of the rough-in stage.