 EVE卫浴
EVE卫浴
Do You Really Need a Wall Mount Faucet Installation Kit — and What’s Inside One?
浏览次数:527 分类:公司产品
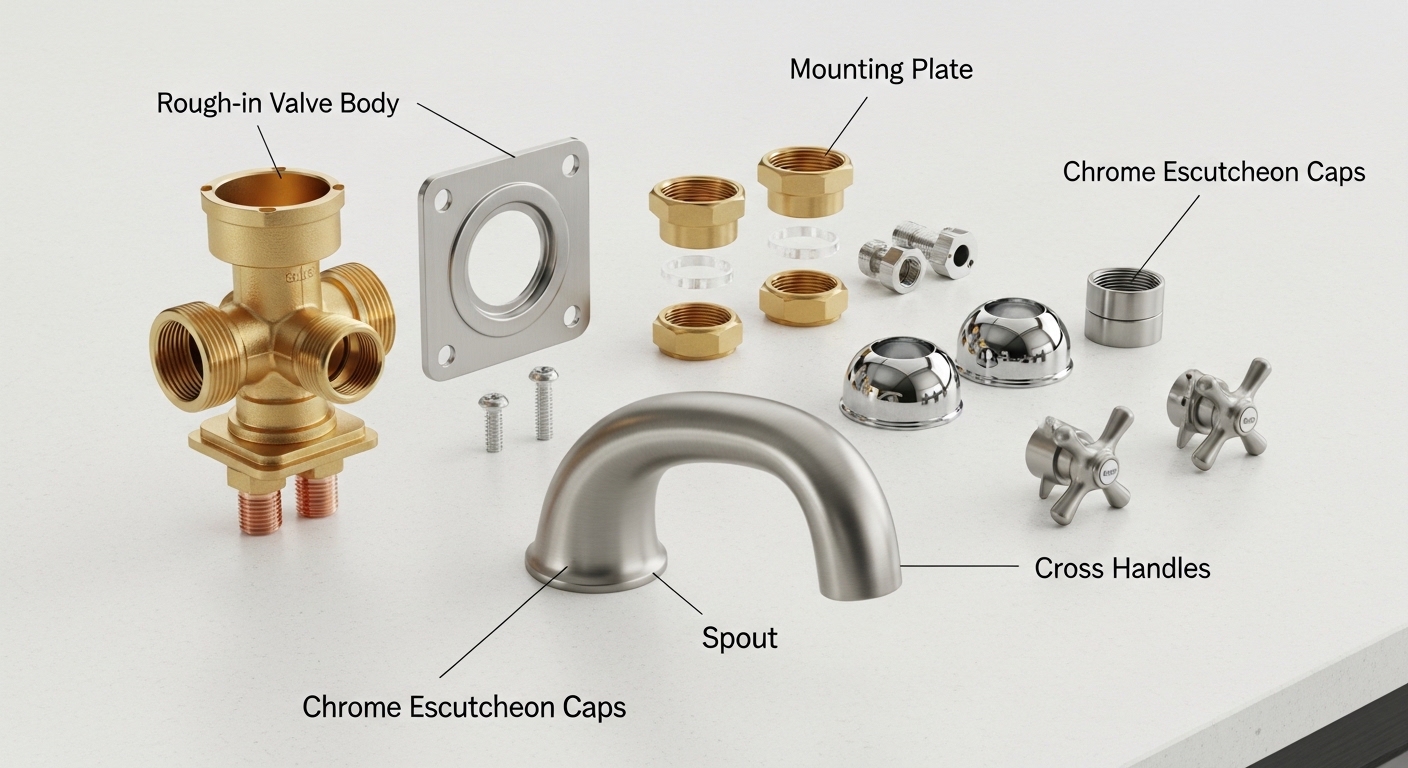
If you’re shopping for a wall mounted tap for a bathroom vanity, a vessel sink, a farmhouse kitchen, or a freestanding tub, the single most important thing you can buy is the right wall mount faucet installation kit — not just the pretty spout you saw in a showroom photo. The kit is what actually makes the faucet work with real plumbing hidden inside your wall. Get it wrong and you’re looking at a spout that sits too proud of the tile, handles that won’t seat, or worse, a leak buried behind finished drywall. Get it right and the whole thing installs cleanly in an afternoon.
Below, I’ll walk through exactly what’s in a good kit, how to tell if you need one, how to measure so the parts fit your wall, and where people most often mess this up. I’ve fitted and troubleshot a lot of wall mount setups, so this is the practical version — not marketing copy.
What exactly is in a wall mount faucet installation kit?
A complete wall mount faucet installation kit contains everything that lives between your water supply lines and the visible faucet: the rough-in valve body (which mounts inside the wall cavity before tile goes up), a mounting bracket or plate, threaded nipples and couplers, escutcheon plates that cover the wall penetrations, rubber or fiber washers, and usually a set of depth extensions so the trim can be dialed in to your finished wall thickness.
The reason this matters is that a wall mount faucet is really a two-stage product. There’s the “rough-in” part that a plumber or you install before the wall is closed up and tiled, and the “trim” part — the spout and handles you see — that goes on after. The installation kit is what bridges those two stages and compensates for the fact that nobody knows the exact final wall thickness until the tile is set.
Here’s the typical contents broken down:
- Rough-in valve body: the working guts, with inlets for hot and cold and an outlet to the spout. Buried in the wall.
- Mounting bracket / plate: anchors the valve to a stud or cross-brace so it doesn’t shift when you turn the handle.
- Threaded couplers & nipples: extend the valve stems and outlets out to the finished wall face. Often available in multiple lengths.
- Escutcheons (trim plates/flanges): the decorative discs that hide the hole where each stem or the spout passes through tile.
- Washers, O-rings & plumber’s-grade seals: the small parts that actually stop leaks.
- Depth extension kit: spacer sleeves that let the handles and spout sit flush regardless of tile thickness.
Do all wall mount faucets come with the kit, or do you buy it separately?
It depends on the brand, and this trips people up constantly. Some faucets ship as a complete package (rough-in valve + trim + kit in one box), while many premium and European-style faucets sell the trim and the rough-in valve separately — meaning the mounting hardware you need is a distinct purchase. Always check the spec sheet for the phrase “rough-in valve included” or “sold separately.” If it says trim only, you must buy the matching installation kit or valve, and it has to be the same brand/series or the stems won’t line up.
How do I know if I even need a wall mount faucet installation kit?
You need one any time the faucet mounts to the wall rather than to the sink deck or countertop — that’s the short answer. If the water comes out of the wall and there are no holes drilled in your sink or counter for the faucet, it’s a wall mount, and it requires the in-wall rough-in and mounting hardware that the kit provides.
A quick gut check — you need a wall mount faucet installation kit if any of these describe your project:
- You have a vessel sink sitting on a counter with no faucet holes, and you want the spout to arc over it from the wall.
- You’re installing a freestanding or apron-front tub where the filler comes out of the wall.
- You have a farmhouse/utility kitchen sink and want a high-clearance wall spout for filling pots.
- Your existing supply lines already stub out of the wall (a previous wall mount was there).
- You’re doing a gut renovation and the walls are open, which is honestly the easiest time to do this.
If instead your sink or counter has one or three holes drilled in it, you want a deck-mount faucet, not a wall mount — and a different set of parts entirely. If you’re weighing the look of a wall mount before committing, it’s worth reading whether a wall mount faucet in black is worth it for your bathroom or kitchen, since finish and mounting style are decisions you really want to lock in before you open the wall.
What’s the difference between the rough-in valve and the trim kit?
The rough-in valve is the pressure-holding, water-controlling body that gets plumbed and buried inside the wall before tiling; the trim kit is the finished spout, handles, and escutcheons you install afterward. You can’t buy just one and expect a working faucet — you need both, and they must be compatible.
Think of it like a light switch: the rough-in valve is the electrical box and wiring inside the wall, and the trim is the visible switch plate and lever. The installation kit is the collection of adapters and spacers that let the trim mate perfectly to the rough-in no matter how thick your wall finished out. This two-part design is deliberate — it lets the builder set the plumbing early and the finish carpenter/homeowner pick the exact spout months later.
Why does finished wall thickness matter so much?
Because the valve is set at a fixed depth in the framing, but nobody knows the final surface until backer board, thinset, and tile are all in — that stack can add anywhere from about ⅜ inch to over an inch. If the trim was designed only for a thin wall and your tile is thick, the handles won’t reach; if the valve sits too deep, the escutcheon floats off the wall. This is precisely why the kit includes extension couplers and spacer sleeves. Most quality rough-in valves have a molded “plaster ground” line stamped on them showing the acceptable range of finished wall face — install to that line and the trim will fit.
Wall mount vs. deck mount vs. widespread: which parts do I actually need?
Wall mount needs an in-wall rough-in valve plus a wall installation kit; deck mount needs only supply connectors and mounting nuts under the sink; widespread deck faucets need connectors that tie three separate pieces together. Here’s how they compare so you don’t buy the wrong hardware.
| Mounting type | In-wall rough-in? | Kit parts you need | Best for | DIY difficulty |
|---|---|---|---|---|
| Wall mount | Yes — required | Rough-in valve, bracket, couplers, escutcheons, extensions | Vessel sinks, tub fillers, farmhouse kitchens | Hard (best during reno) |
| Single-hole deck | No | Supply lines, mounting nut, deck plate | Standard vanities, bar sinks | Easy |
| Widespread deck (8″) | No | Widespread connector, 3 supply tubes, valves | Larger vanities, 3-hole sinks | Moderate |
| Centerset deck | No | Base plate gasket, supply lines | Small 4″ bathroom sinks | Easy |
If you’re actually deciding between a wall mount and a widespread deck setup for a bathroom vanity, the connector hardware is completely different — it’s worth understanding what a widespread faucet connector is and how to pick the right one before you commit, because a widespread installs on the deck and needs no in-wall work at all. And if your sink already has three holes, check the right 3-hole faucet hole size and whether it’ll fit — that tells you immediately whether a deck faucet is even an option or whether wall mount is your cleaner path.
How do you measure for a wall mount faucet installation kit?
Measure three things: the on-center spacing between your hot and cold supply stub-outs, the height of the spout stub above the sink rim, and your total finished wall thickness. Those three numbers determine which kit and extension lengths you need. Most residential wall mount faucets use a standard 8-inch on-center handle spread, but always verify against the faucet’s spec sheet.
Here’s the measuring routine I use, in order:
- On-center spread: distance from the center of the hot stub to the center of the cold stub. 8″ is the residential standard for two-handle wall mounts; some single-lever and commercial units differ.
- Spout height clearance: for a vessel sink, you want the spout roughly 4–6 inches above the sink’s top rim so water clears the basin without splashing. Set the valve accordingly.
- Finished wall thickness: measure from the framing/valve mounting face out to where the tile surface will land. This picks your extension length.
- Reach/projection: how far the spout sticks out — it must clear the front edge of the sink so water lands in the bowl, not on the counter.
Getting the spout reach and height right for a vessel sink is genuinely the most common mistake. If you like the above-counter vessel look, this pairs closely with picking the basin itself — our guide on whether a stainless steel vessel faucet is the right choice for an above-counter sink covers how spout arc and basin depth work together so you don’t end up with a splash problem.
What tools and skills do I need to install it myself?
You need an adjustable wrench, plumber’s tape (PTFE thread seal tape), a level, a tube cutter if you’re adjusting copper, and basic soldering or press-fit skills if the supply connections aren’t already threaded. The trim installation — the part after the wall is finished — is genuinely DIY-friendly and usually needs only a wrench and an Allen key. The rough-in stage, where you connect to live water lines inside the wall, is where a lot of people call a plumber, and that’s a reasonable call if you’re not comfortable soldering or the walls are already closed.
Honest expectation setting: if your walls are open (new build or gut reno), a confident DIYer can do the whole thing. If the wall is already finished and there’s no existing wall mount rough-in, you’re opening a wall, and that’s a bigger job than a weekend project.
Common mistakes that cause leaks (and how to avoid them)
The top three failure points are: not testing the rough-in valve for leaks before closing the wall, over-tightening escutcheons and cracking tile, and skipping thread seal tape on threaded couplers. Each is completely avoidable with a few minutes of care.
- Pressure-test before you tile. Once the valve is plumbed, turn the water on and leave it under pressure for 24 hours with the trim off. A slow weep is invisible once tile hides it — and a nightmare to fix later.
- Don’t overtighten escutcheons. Snug plus a hair. Cranking them down cracks tile and distorts the seal.
- Tape every threaded joint. Two to three wraps of PTFE tape, clockwise, on couplers and nipples.
- Support the valve rigidly. If the mounting bracket flexes, every handle turn stresses the connections until one leaks. Anchor to solid framing.
- Match the brand. Trim from Brand A rarely fits a rough-in from Brand B, even if the stems look similar.
If you do end up with a slow leak at the base of a faucet down the road, the diagnostic approach is similar to a deck faucet — our walkthrough on why a kitchen faucet leaks at the base and how to fix it yourself covers the seal-and-O-ring logic that applies to wall mount trim too.
Are wall mount faucet installation kits worth the extra cost and effort?
For the right project, yes — a wall mount faucet installation kit unlocks a clean, high-end look (no clutter on the counter, easy-to-wipe deck) and is the only way to properly run a vessel sink or freestanding tub filler. For a standard vanity where a deck faucet would work fine, the extra rough-in labor usually isn’t worth it unless you specifically want the wall-mounted aesthetic.
The value math is really about timing. During a renovation with open walls, the added cost of doing a wall mount is modest and the payoff is a striking, functional result. Retrofitting into a finished wall is where costs climb, because you’re paying for demolition and tile repair. So the honest advice: if you’re renovating, absolutely consider it; if you’re just swapping a faucet on a finished wall with no existing rough-in, a deck mount is far less hassle.
How much should a good kit cost?
Expect roughly $40–$120 for the installation hardware/rough-in valve on a mid-range residential faucet, on top of the trim (spout and handles) which ranges widely by finish and brand. Beware of a “cheap” wall mount faucet listing that turns out to be trim-only at $60 — you’ll still need the $80 valve, so compare complete-system pricing, not just the pretty part.
Author’s note & why trust evefaucet
This guide was written by the evefaucet product team, drawing on hands-on installation experience across bathroom and kitchen fixture projects and direct feedback from plumbers who fit our hardware. At evefaucet, we design and pressure-test our wall mount faucet systems to standard residential water-pressure specifications, and our rough-in valves are built to work with standard 8-inch on-center configurations for straightforward compatibility. Our faucets are backed by a manufacturer’s warranty, and our support team can help you match the correct rough-in valve and installation kit to your specific faucet series before you buy — so you don’t end up with mismatched trim and valve. We only sell faucets and bathroom fixtures, which means the advice here comes from people who work with these exact parts every day.
FAQ
Can I install a wall mount faucet without opening the wall?
Only if there’s already a compatible rough-in valve stubbed out in the wall from a previous wall mount faucet. If there isn’t, you must open the wall to install the rough-in valve and mounting bracket — there’s no way around it, because the working parts live inside the wall cavity.
Are wall mount faucet installation kits universal across brands?
No. The trim (spout and handles) generally must match the same brand and series as the rough-in valve, because stem lengths, splines, and outlet spacing vary. Escutcheons and some couplers may be interchangeable, but never assume — always confirm the valve and trim are a matched set on the spec sheet.
What’s the standard on-center spacing for a two-handle wall mount faucet?
8 inches on-center is the residential standard for two-handle wall mount bathroom and kitchen faucets, matching the widespread deck standard. Single-lever and commercial units can differ, so verify the number on your faucet’s dimension drawing before roughing in the valve.
Do I need a plumber, or can I DIY a wall mount faucet installation kit?
The trim installation (after the wall is finished) is DIY-friendly with just a wrench and Allen key. The rough-in stage, which involves connecting to live water lines inside the wall, requires plumbing skill — if you can solder or press-fit copper and the wall is open, you can do it; if not, hire a plumber for the rough-in and finish the trim yourself.
How far should a wall mount spout stick out over a vessel sink?
The spout should project far enough that water lands in the center of the basin — typically the spout tip sits over roughly the middle of the bowl — and about 4–6 inches above the sink’s top rim to prevent splashing. Match spout reach to your specific basin diameter; a small vessel needs less projection than a wide one.
Will a wall mount faucet installation kit work for a freestanding tub filler?
A wall-mounted tub filler uses the same rough-in-plus-trim concept, but the valve, spout, and flow rate are sized for a tub, not a sink. Don’t use a bathroom-sink wall mount kit for a tub filler — buy the kit rated for tub filling, which has higher flow and a longer spout reach designed to clear the tub rim.