 EVE卫浴
EVE卫浴
What Is the Right Shower Valve Rough In Distance From the Finished Wall?
浏览次数:844 分类:Install
Here is the complete, publish-ready HTML article:
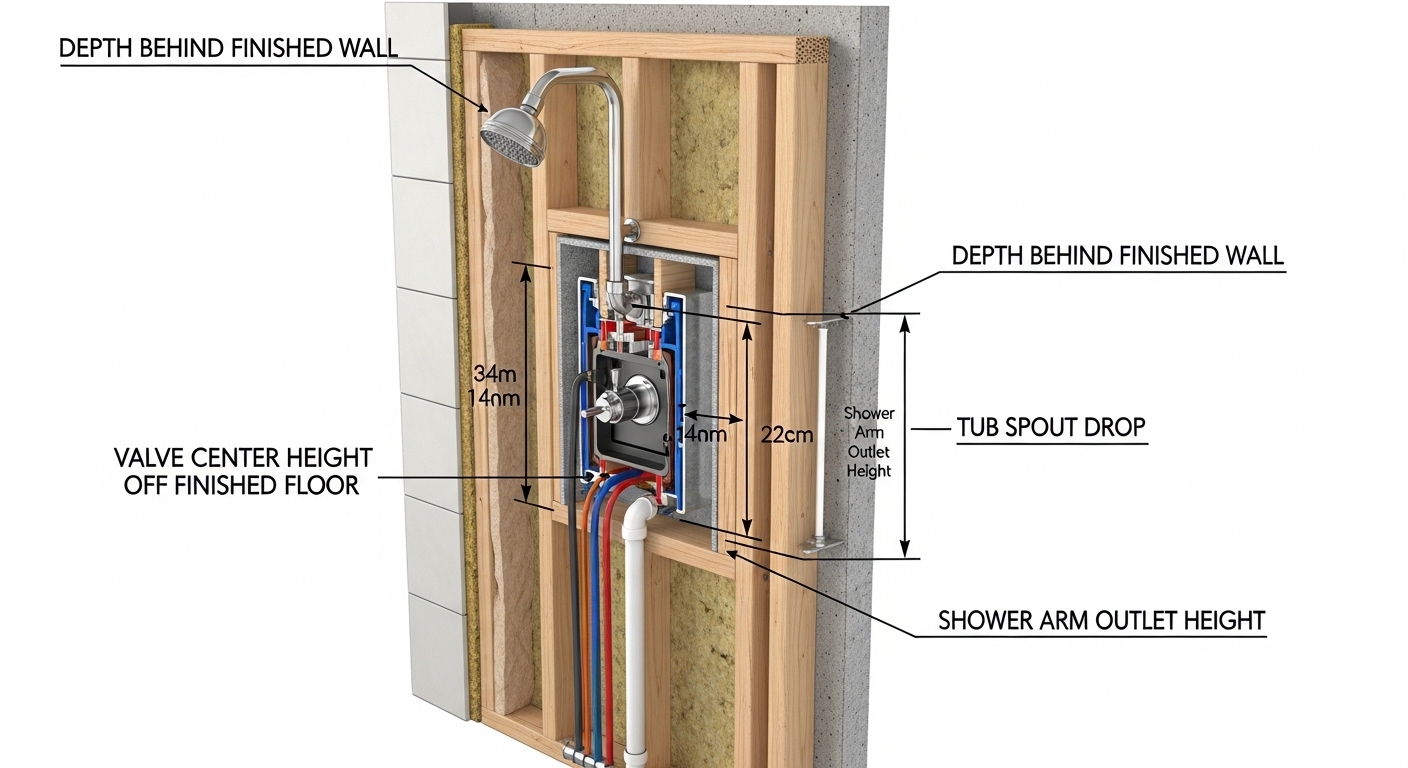
Getting the shower valve rough in distance right is the single most important measurement in a shower plumbing job, and it’s the one people get wrong most often. The “rough in distance” really covers two things at once: how deep the valve body sits behind the finished wall (front-to-back), and how high it’s mounted off the floor. Miss the depth and your trim plate won’t seat flush or the handle won’t turn; miss the height and the spout, valve, and shower head end up in awkward, non-standard positions. This guide breaks down the exact numbers, why they matter, and how to check yours before the tile goes up — because once it’s tiled, fixing it means demolition.
What Exactly Does “Rough In Distance” Mean on a Shower Valve?
Rough in distance is the depth from the finished wall surface to a reference point on the valve body — and every valve gives you an acceptable range, not a single number. Manufacturers cast a marker into the valve (often called the “plaster ground,” a molded ring, or a set of ridges) that tells you exactly where the finished wall should fall. As long as your finished wall lands between the minimum and maximum marks, the trim will fit and the cartridge stem will stick out far enough to accept the handle.
Here’s the part that trips people up: “finished wall” is not the same as the framing or the backer board. Finished wall means the front face of your tile, the surface of your solid-surround panel, or the outer face of your fiberglass unit — whatever water actually touches. If you’re tiling, you have to account for the backer board thickness, the thinset bed, and the tile itself. A common real-world stack is 1/2″ cement board + about 1/8″ thinset + 1/4″ to 3/8″ tile, which pushes your finished surface roughly 7/8″ to 1″ out past the studs. Set your valve depth from that finished plane, never from the stud face.
Because the acceptable window is usually an inch or more wide, you have some forgiveness — but only if you plan for the tile. The classic failure is roughing the valve for bare drywall, then adding backer and tile, and discovering the valve is now buried an inch too deep for the trim to reach.
How Deep Should the Valve Sit Behind the Finished Wall?
For most modern pressure-balance and thermostatic valves, the sweet spot is having the finished wall land somewhere between about 1-3/4″ and 3-1/4″ in front of the valve’s mud guard — but you must confirm your specific model’s spec sheet, because ranges differ by brand. The molded plaster ground on the valve is your target: the finished tile face should sit at or between the min/max lines printed on that guard.
The most reliable way to nail this is to dry-fit before you commit. Mount the valve to a cross-brace between studs, then hold a straightedge across the studs to simulate where drywall or backer will sit, and measure out to where the finished tile face will end up. If the finished face lands inside the guard’s window, you’re good. If it doesn’t, move the valve now — shimming the cross-brace forward or back a bit is trivial before tile and impossible after.
A few practical notes that save do-overs:
- Leave the plaster guard on until the wall is finished. It protects the cartridge from thinset and grout and marks the depth line — don’t toss it during rough-in.
- Account for every layer. Backer board, waterproofing membrane, thinset, and tile all add depth. Add them up before you set the valve.
- Deeper is easier to fix than too shallow. If a valve ends up slightly deep, some brands sell extension kits. If it’s too proud (shallow), you’re often stuck notching the trim or re-setting the valve.
- Keep the valve plumb and level. A valve tilted in the bay throws off both depth and handle alignment.
How High Off the Floor Should a Shower Valve Be Roughed In?
Standard shower valve height is 45″ to 48″ from the finished floor to the center of the valve for a shower-only or shower-over-tub setup, though it comes down to how tall the users are and whether it’s a tub-shower combo. The valve handle needs to be reachable from outside the spray when you turn it on, which is why it sits noticeably lower than the shower head.
These are the height numbers pros default to, all measured from the finished floor:
| Component | Typical rough-in height (finished floor) | Notes |
|---|---|---|
| Shower-only valve center | 45″–48″ | Raise to 48″–52″ for tall households or curbless walk-ins |
| Tub-shower combo valve center | 28″–32″ | Lower so it’s reachable while seated in the tub |
| Tub spout | ~4″ above tub deck / rim | Must clear the rim and drop water inside the tub |
| Shower arm outlet (drop-ear elbow) | 78″–80″ | Higher for tall users; wall-mount rain heads may differ |
| Handheld slide bar (top) | ~72″–78″ | Set for the shortest primary user to reach the top bracket |
One height detail people forget: in a tub-shower combo, the valve goes lower (around 28″–32″) than in a stand-alone shower, because you want to reach it while sitting in the tub. If you’re plumbing a walk-in or a curbless shower for a taller household, bumping the valve up to 48″–52″ and the shower arm to 80″–82″ makes the whole shower feel custom instead of cramped. Standards are a starting point, not a law — measure your actual users.
What’s the Difference Between a Tub Spout and Shower-Only Rough-In?
The big difference is whether the valve has a diverter and a spout drop, plus the valve height. A tub-shower valve is a three-port body (hot in, cold in, one outlet up to the shower plus a separate outlet down to the spout with a diverter), while a shower-only valve caps or omits the bottom spout port entirely. Getting these ports plumbed to the wrong outlets is a surprisingly common rough-in mistake.
On a tub-shower combo, the tub spout also does double duty as the pressure-relief path: the diverter can’t seal perfectly, so water always has an open route out the spout, which is why you never cap a tub spout outlet on a diverter valve. If you’re converting a tub-shower to a shower-only, you plug the lower outlet with the manufacturer’s plug — not just any cap. And if you’re the one actually mounting the spout after the wall is done, our walk-through on how to put a tub spout in yourself without calling a plumber covers slip-fit vs. threaded spouts and the pipe-length gotchas that cause leaks behind the wall.
For shower-only builds, the shower arm comes off a drop-ear elbow anchored to the framing at 78″–80″. The arm threads into that elbow, and the head threads onto the arm. If you’re adding a handheld on a hose off the same arm or a separate outlet, our guide to installing a shower head with a hose without leaks gets into the thread-tape and connection details that keep the joint dry.
Pressure-Balance vs. Thermostatic: Does the Valve Type Change the Rough-In?
Yes — the rough-in numbers are similar, but thermostatic and multi-function valves are physically bigger and often need a deeper, wider stud bay and more outlets. A basic pressure-balance valve fits comfortably in a standard 2×4 wall; a thermostatic valve with volume controls and multiple outlets (rain head plus body sprays plus handheld) can need a deeper wall cavity, blocking on both sides, and careful outlet planning.
Here’s how the common valve types compare for a rough-in:
| Valve type | Temp control | Rough-in footprint | Best for |
|---|---|---|---|
| Pressure-balance | Prevents scald from pressure drops; temp shifts with supply | Compact; fits standard 2×4 wall | Most homes, tub-shower combos, budget builds |
| Thermostatic | Holds a set temperature precisely, independent of supply swings | Larger body; often needs deeper bay and more outlets | Spa showers, multiple simultaneous outlets, luxury remodels |
| Thermostatic + volume | Precise temp plus independent flow per outlet | Largest; multiple outlets, careful blocking required | Custom multi-spray systems |
The key takeaway: pick and buy your valve before you frame and rough-in, and rough-in to that exact valve’s spec sheet. Don’t rough-in generic and hope the valve fits, and don’t run copper to a diverter valve assuming you’ll “figure out the outlets later.” The depth window, port layout, and outlet count are model-specific. Buying the trim from the same line as the valve at the same time also saves you the classic headache of a valve and trim that don’t match.
How Do I Check My Rough-In Before Tiling — And What If It’s Wrong?
Dry-fit the trim against a straightedge that represents your finished wall before a single tile goes up — that five-minute check is the difference between a clean install and tearing out fresh tile. Hold a level or scrap of your actual tile-plus-backer stack across the valve opening, thread the trim on, and confirm the handle turns freely and the escutcheon (trim plate) sits flush without gapping or bottoming out.
If the check shows a problem, here’s the fix path by scenario:
- Valve too deep (buried): Check whether the manufacturer sells a trim extension kit for that model — many do. It’s a spacer that brings the stem and escutcheon out to reach the finished wall.
- Valve too shallow (too proud): Harder. You’ll usually need to reset the valve deeper on its cross-brace, or in a pinch shim the escutcheon — but that can look off. Reset it while you can.
- Valve off-center or tilted: Re-secure the cross-brace so the body is plumb, level, and centered in the opening before you close the wall.
- Height feels wrong for the users: If the wall is still open, move it now. Standards are guidelines; a shorter valve or higher shower arm for your actual household is a legitimate adjustment.
The reason we push the dry-fit so hard is cost asymmetry: adjusting a valve during rough-in is a few minutes with a screwdriver, while fixing it after tile means cutting out a section of finished wall, re-waterproofing, and re-tiling. Test twice, tile once.
FAQ
What is the standard shower valve rough in distance from the finished wall?
Most residential pressure-balance and thermostatic valves want the finished wall (the face of your tile or surround) to land within the min/max lines on the valve’s molded plaster guard — commonly a window somewhere between about 1-3/4″ and 3-1/4″ of depth behind the finished surface. Always confirm the exact range on your specific valve’s spec sheet, because it varies by brand and model.
How high should a shower valve be from the floor?
For a shower-only setup, rough the valve center in at 45″–48″ from the finished floor. For a tub-shower combo, drop it to about 28″–32″ so it’s reachable from inside the tub. Adjust upward (48″–52″) for a tall household or a walk-in shower.
Do I measure rough-in depth from the studs or the finished wall?
Always from the finished wall — the outer face of your tile, panel, or fiberglass unit that water touches. Add up your backer board, thinset, and tile thickness (often around 7/8″ to 1″ past the studs) and set the valve depth from that finished plane, not the framing.
Can I fix a shower valve that’s roughed in too deep?
Often yes. Many manufacturers sell a trim/extension kit that adds a spacer to bring the stem and escutcheon out to reach the finished wall. A valve that’s too shallow (sticking out too far) is harder — you usually have to reset it deeper on its cross-brace, so it’s far better to catch depth problems during a dry-fit before tiling.
Does the shower valve rough in distance change for a rain shower head?
The valve depth spec doesn’t change, but a ceiling-mount or wall-mount rain head changes your outlet plumbing and often calls for a thermostatic or volume-control valve with multiple outlets — which needs a deeper, better-blocked stud bay. Plan the valve type and outlet layout around the rain head before you frame, not after.
Why won’t my shower trim plate sit flush against the wall?
Almost always a rough-in depth problem: the valve is either too deep for the trim to reach or too proud so the escutcheon can’t seat. Confirm the finished wall lands inside the valve’s plaster-guard window; if the valve is too deep, look for that model’s extension kit before assuming you have to open the wall.
About the author: This guide was written by the EveFaucet product and installation team, who spec, bench-test, and troubleshoot shower valves and trim kits day in and day out. Why trust EveFaucet: we design and sell faucets, shower systems, and bathroom fixtures direct to homeowners and remodelers, and we test our valves against recognized North American plumbing standards (including ASME A112.18.1/CSA B125.1 for fixture fittings and the anti-scald requirements of ASSE 1016 for pressure-balance and thermostatic valves). Our shower valves are backed by a manufacturer’s warranty, and every product ships with a model-specific rough-in and trim spec sheet — the document you should measure against on your own install. When in doubt on a load-bearing or code-sensitive detail, confirm with your local plumbing inspector, since rough-in heights and anti-scald requirements can be governed by local code.