 EVE卫浴
EVE卫浴
What Do Faucet Aerator Images Actually Tell You Before You Buy a Replacement?
浏览次数:9 分类:公司产品
If you’ve been scrolling through faucet aerator images trying to figure out which little metal insert screws into the end of your tap, you’re doing exactly the right thing — because 90% of aerator buying mistakes come from ordering the wrong shape, not the wrong brand. An aerator is the small screw-on tip at the very end of your spout that mixes air into the water, softens the stream, cuts splashing, and controls flow. They look almost identical at a glance, but the differences that matter — thread direction, thread diameter, and how they seat — are things you can only nail down by comparing a clear photo to the part you’re holding.
This guide walks you through how to read those images like a plumber does, how to measure without calipers, and how to pick the right flow rate for your sink. At evefaucet we spend a lot of time answering “which one is mine?” emails, so we built this to be the page that actually shows you the difference.
How Do I Tell From a Photo Which Type of Aerator I Have?
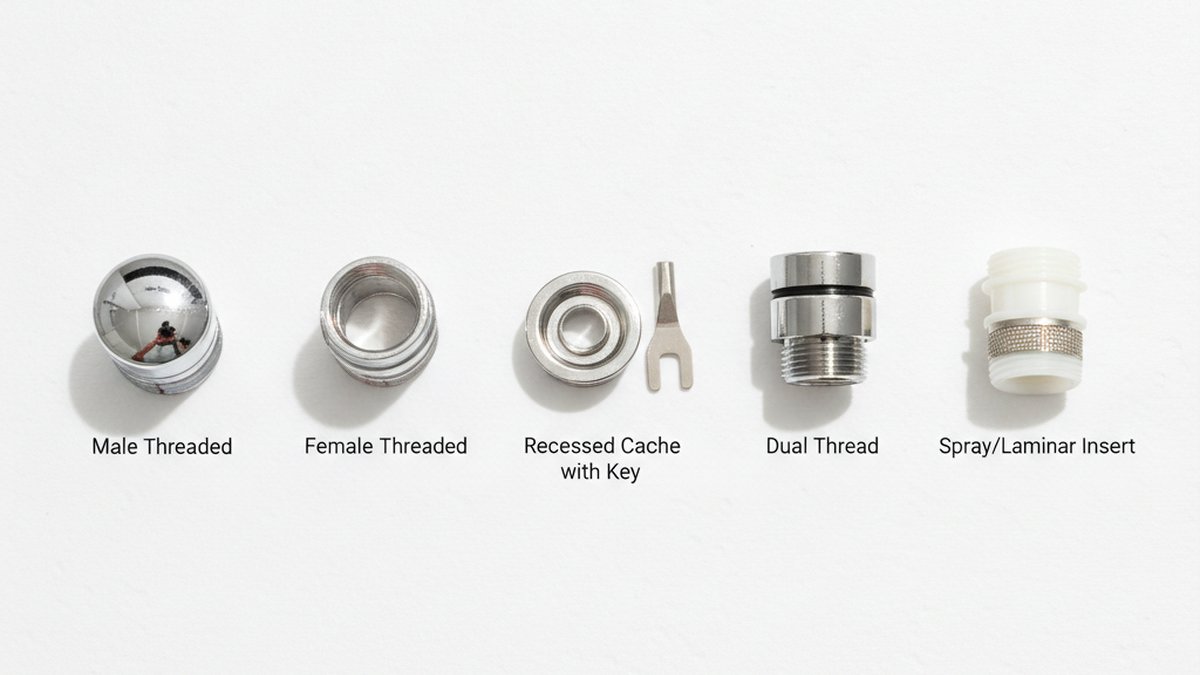
Look at where the threads sit. If the threads are on the outside of the aerator body, it’s a male aerator and your faucet spout has internal (female) threads. If the threads are on the inside of the aerator (you can see a smooth outer collar with grooves hidden inside the rim), it’s a female aerator and your spout is externally threaded. That single visual cue rules out half the products on any store page.
There’s a third type that trips people up in photos: the cache aerator (also called hidden or recessed). It sits flush inside the spout tip with a smooth, threadless outer face and a small notched pattern or pinholes you can see from below. These need a special key or wrench to remove — if the end of your faucet looks seamless with no knurled ring to grip, you almost certainly have a cache aerator. Modern pull-down kitchen and bathroom faucets use these because they look cleaner.
- Male aerator: threads visible on the outside, no gripping ring needed on the spout side.
- Female aerator: knurled outer ring you grip by hand, threads tucked inside.
- Cache / hidden aerator: smooth flush face, removed with a plastic or metal key.
- Dual-thread aerator: has both male and female threads so it fits two spout sizes — common in hardware-store repair kits.
When you compare faucet aerator images side by side, the fastest tell is the knurled ring: a hand-tightened ring means female, no ring means either male (threads exposed) or cache (smooth). If you’re troubleshooting weak flow rather than replacing for looks, our guide on why a faucet aerator gets blocked and how to fix a trickling tap is the better starting point before you buy anything at all.
What Size Faucet Aerator Do I Need — and How Do I Read It From an Image?
Most residential aerators come in one of three standard sizes, and you can estimate yours by comparing the diameter to a coin in the photo. The three common thread sizes in the U.S. are Regular (M24 male / M22 female), Junior (M18.5), and Tom Thumb / Cache (M16.5). Regular is by far the most common on kitchen and standard bathroom faucets; Junior and Tom Thumb show up on smaller bar and bathroom taps.
Here’s the plain-language trick: a Regular male aerator is roughly the diameter of a U.S. penny (about 15/16″, or 24mm). A Junior sits noticeably smaller, and a Tom Thumb is smaller still. If a product photo shows the aerator next to a coin or a ruler, use that scale. If it doesn’t, that’s a small red flag about the listing quality.
| Size Name | Male Thread | Female Thread | Approx. Diameter | Typical Use |
|---|---|---|---|---|
| Regular | M24 x 1 | M22 x 1 | ~24 mm (penny-sized) | Kitchen & most bathroom faucets |
| Junior | M18.5 x 1 | M16.5 x 1 | ~18.5 mm | Small bathroom / bar faucets |
| Tom Thumb / Cache | M16.5 x 1 | — | ~16.5 mm | Compact & hidden-tip faucets |
The only way to be 100% certain is to measure the thread diameter with calipers or take the old aerator to the store. But for narrowing down which faucet aerator images match your part, the coin-comparison method gets most people to the right size on the first try. If you want to avoid the guesswork entirely, the smartest move is to unscrew the existing one and read any markings — many are stamped “M24” or “55/64-27” (the imperial equivalent) right on the body.
What Do the Different Spray Patterns Look Like — Aerated vs. Spray vs. Laminar?
The insert screen inside the aerator determines the stream, and you can spot the difference in close-up images. Aerated streams look soft, white, and bubbly because air is mixed in — that’s the classic splash-free stream on most faucets. Spray (or “shower”) aerators break the water into many separate needle-thin streams, useful for rinsing but splashier. Laminar flow produces a single crystal-clear, glass-like column with no bubbles — popular in healthcare and high-end kitchens because it resists bacterial aerosol and looks premium.
- Aerated: soft white foamy stream, feels fuller, low splash — best all-rounder for handwashing.
- Spray: multiple fine jets, great for rinsing produce or a shallow bar sink.
- Laminar: clear solid stream, no air, minimal aerosol — cleanest look, slightly more splash in shallow basins.
In photos, the giveaway is the face of the insert: a fine mesh screen behind a metal grid means aerated; a rubber disc with many tiny holes means spray; and a smooth honeycomb of straight parallel channels means laminar. Knowing which one you want changes the buying decision as much as the thread size does.
Which Flow Rate Should I Choose — and Can I See It in the Photo?
Flow rate is measured in gallons per minute (GPM) and it’s almost always printed or laser-etched right on the aerator’s flat side, so a good product image will show it. For a kitchen faucet, 1.5 to 2.2 GPM is the sweet spot — enough to fill pots quickly. For a bathroom faucet, 1.0 to 1.5 GPM is plenty for handwashing and saves water. Anything labeled 0.5 GPM is an ultra-low-flow model for water-restricted regions or commercial restrooms.
California and a few other states cap bathroom faucets at 1.2 GPM and kitchen faucets at 1.8 GPM, so if you live there, look for those numbers on the aerator face in the listing photo. Swapping a 2.2 GPM aerator for a 1.5 GPM one is one of the cheapest water-saving upgrades you can make — often under $5 — and it takes 30 seconds.
| Flow Rate | Stamp on Face | Best For | Notes |
|---|---|---|---|
| 2.2 GPM | 2.2 | Older kitchen faucets | Fastest fill, most water use |
| 1.8 GPM | 1.8 | Kitchen (CA-compliant) | Good balance of power & savings |
| 1.5 GPM | 1.5 | Kitchen & bath all-rounder | Most popular replacement |
| 1.0–1.2 GPM | 1.0 / 1.2 | Bathroom sinks | WaterSense-friendly |
| 0.5 GPM | 0.5 | Commercial / drought areas | Trickle for handwashing only |
If your flow dropped suddenly rather than you choosing to reduce it, the aerator screen is probably clogged with mineral scale or debris — that’s a cleaning job, not a buying job. Weak flow can also point to a bigger faucet issue; if the whole tap died, see our walkthrough on why a kitchen faucet suddenly stops working and how to get water flowing again.
How Do I Remove My Old Aerator to Match It to the Photos?
Turn it counterclockwise by hand first — most aerators are hand-tightened and come off with a firm grip. If it won’t budge, wrap the aerator in a cloth or a wide rubber band for grip and use pliers gently, or use the plastic key that came with a cache aerator. Once it’s off, you can compare it directly against faucet aerator images and read any stamped size or flow markings.
- Put a rag in the drain so nothing small falls in.
- Twist the aerator counterclockwise (righty-tighty, lefty-loosey — looking up at the spout).
- If stuck, wrap in cloth and use adjustable pliers, or apply white vinegar to loosen scale.
- For hidden/cache types, insert the removal key into the notches and turn.
- Lay the parts out in order — aerator body, screen, rubber washer — so you can reassemble or match.
Take a photo of your own aerator on a plain surface next to a coin. That single picture is more useful than any listing image, because now you’re comparing like for like. While you have tools out, it’s worth checking the rubber washer for cracks — a $1 washer is often the real cause of a leak people blame on the aerator. If you’re dealing with a persistent drip rather than flow, our explainer on what a dripping tap actually points to covers whether it’s a washer, cartridge, or something more serious.
Does the Aerator Finish Have to Match My Faucet?
For female and male aerators where the ring is visible, yes — the finish should match your faucet, and product images are how you confirm it. Aerators come in chrome, brushed nickel, matte black, brushed gold/champagne bronze, and oil-rubbed bronze. A mismatched shiny chrome ring on a matte black faucet is instantly noticeable at the tip of the spout.
For cache/hidden aerators, finish barely matters because the part is tucked inside and invisible — you only see a thin edge. So if you have a hidden aerator, focus entirely on size and thread, not color. When you’re matching finishes across a whole fixture, the same logic applies as with mixing metals elsewhere in the bathroom; our piece on whether a brushed nickel faucet goes with a stainless steel sink breaks down how to make finishes look intentional rather than accidental.
Buying Checklist: Turning Images Into the Right Purchase
Before you click buy, run through this quick list against the product photos. If a listing can’t answer these from its images or specs, keep scrolling.
- Thread type: male (external threads) or female (internal threads) — matched to your spout.
- Size: Regular, Junior, or Tom Thumb — confirmed by a scale reference in the image.
- Flow rate: GPM stamped on the face, matched to kitchen vs. bathroom use.
- Spray pattern: aerated, spray, or laminar insert.
- Finish: matches your faucet (skip if it’s a hidden cache type).
- Included parts: gasket/washer and, for cache types, the removal key.
Get those six right and the replacement drops in with no returns. The good news is that aerators are one of the few faucet parts that are genuinely cheap and universal enough that a small kit covering multiple sizes is often the safest buy if you’re unsure.
FAQ
Are all faucet aerators the same size?
No. The three common U.S. sizes are Regular (M24 male / M22 female), Junior (M18.5), and Tom Thumb/Cache (M16.5). Regular fits most kitchen and standard bathroom faucets, but smaller bar and bathroom taps often use Junior or cache aerators, so you must confirm your size before buying.
How do I know if my aerator is male or female?
Look at the threads. If the threads are on the outside of the aerator, it’s male and your faucet is internally threaded. If the threads are hidden inside a knurled ring you grip by hand, it’s female and your faucet is externally threaded. A smooth, threadless face means you have a hidden cache aerator that needs a key.
Can I use faucet aerator images to identify a hidden or cache aerator?
Yes. In photos, a cache aerator has a flush, seamless face with no gripping ring and small notches or a pinhole pattern visible from below. It’s removed with a plastic or metal key rather than by hand, and it’s most common on modern pull-down kitchen and single-handle bathroom faucets.
What flow rate aerator is best for a bathroom faucet?
For a bathroom sink, 1.0 to 1.5 GPM is ideal — enough for comfortable handwashing while saving water. If you live in California or another regulated state, choose a 1.2 GPM model to stay compliant. Look for the number stamped on the aerator face in the product image.
Why did my faucet lose pressure after I cleaned everything but the aerator?
The aerator screen is the most common culprit for sudden low flow because mineral scale and grit collect there first. Unscrew it, soak it in white vinegar for 30 minutes to dissolve limescale, rinse, and reinstall. If flow is still weak with the aerator removed entirely, the problem is further upstream in the valve or supply line.
Do I need to replace the whole aerator or just the screen?
Often just the screen and washer. If the housing threads are intact and the finish is fine, a new insert screen and rubber gasket restore performance for pennies. Replace the whole aerator if the housing is cracked, cross-threaded, corroded, or if you want to change the flow rate or spray pattern.
About the Author & evefaucet
Written by the evefaucet product team, who handle hundreds of aerator fitment questions every month and test replacement parts against the faucets we sell. evefaucet is a dedicated faucet and bathroom-fixtures specialist, and our aerators meet standard M24/M22 threading and are tested to WaterSense flow-rate labeling and NSF/ANSI 61 material standards. Our fixtures ship with a limited warranty, and our support team can match a photo of your old aerator to the correct replacement before you order — so you don’t buy twice.