 EVE卫浴
EVE卫浴
What Is Outdoor Faucet Packing, and How Do You Stop a Leak Around the Handle?
浏览次数:677 分类:公司产品
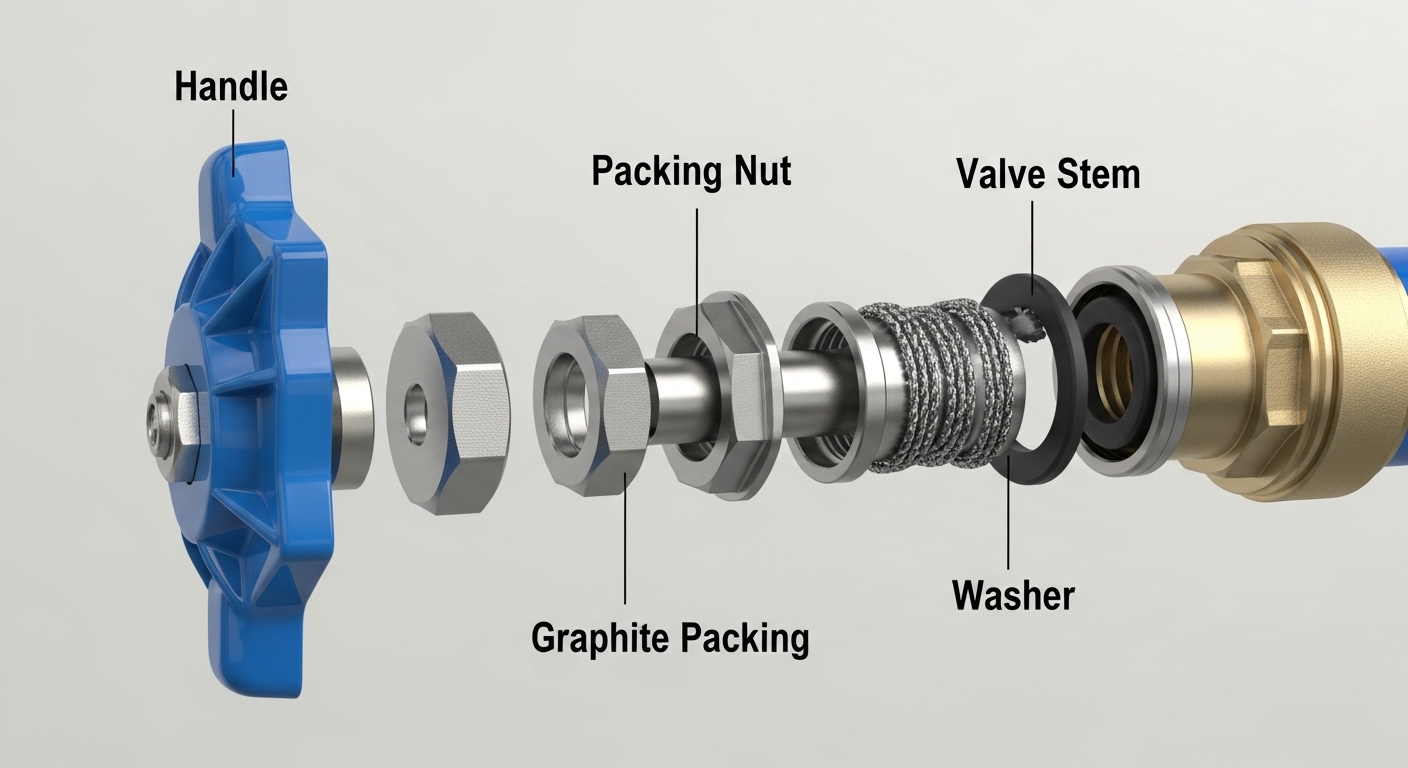
If you’ve ever turned on your garden hose and watched water bubble up around the handle instead of coming out the spout, you’ve met a worn-out outdoor faucet packing. It’s one of the most common — and most misunderstood — faucet failures, because people assume a leak means the whole spigot is shot. It usually isn’t. The packing is a small, cheap, replaceable seal, and once you understand what it does, you can fix or shop for the right part in about ten minutes.
This guide covers exactly what packing is, how to tell packing from other outdoor faucet leaks, when to tighten versus replace, which packing material to buy, and how to choose a frost-proof sillcock that won’t put you back here next spring. Let’s get into it.
What exactly is outdoor faucet packing — and what does it seal?
Outdoor faucet packing is the seal that wraps around the valve stem — the metal shaft the handle turns — right where the stem passes through the packing nut and out to the handle. Its only job is to keep pressurized water from creeping up along the moving stem and leaking out the top of the faucet.
Here’s the key distinction most homeowners miss. An outdoor faucet has two separate seals, and they fail in different ways:
- The seat washer (bibb washer) — at the bottom of the stem. This seals the actual water flow. When it fails, water drips out of the spout even when the handle is fully closed.
- The packing — around the stem near the handle. This seals the moving shaft. When it fails, water leaks around the handle, and usually only while the faucet is turned on.
So the location of the leak tells you which part to fix. Drip from the spout when off? That’s the washer. Water weeping or spraying around the handle when it’s running? That’s the packing. Getting this right saves you from replacing the wrong part.
Packing comes in three common forms, and knowing which your faucet uses matters when you buy a replacement:
| Packing type | What it looks like | Best for | Rough cost |
|---|---|---|---|
| Graphite packing string | Soft, black, waxy braided cord you wrap around the stem | Older compression sillcocks with a packing nut; universal fit | $4–8 per roll |
| Packing washer / friction ring | Fiber or graphite-fiber flat washer sized to the stem | Faucets designed for a pre-formed washer | $2–5 per pack |
| O-ring stem seal | Rubber ring in a groove on the stem | Newer frost-proof sillcocks and cartridge-style outdoor faucets | $3–7 per assortment |
Graphite string is the most forgiving because it fits nearly any stem diameter — you just wind on as much as you need. O-rings and pre-formed washers require you to match the exact size, so bring the old one to the store or note your faucet’s brand and model.
Why is water leaking around my outdoor faucet handle when I turn it on?
Water leaking around the handle means the packing has dried out, compressed, or crumbled, so it no longer grips the valve stem tightly. It’s the single most common cause of a handle leak, and it’s almost always a five-minute fix.
Packing wears out for predictable reasons. Every time you turn the handle, the stem twists against the packing, slowly grinding it down. Sun and freeze-thaw cycles dry out graphite string and harden rubber O-rings until they crack. And many people over-tighten the handle to stop a spout drip, which crushes the packing prematurely. After a decade of summers, that little seal simply gives up.
Before you replace anything, try the easiest fix first: tighten the packing nut. This is the hex nut directly behind the handle. With the faucet turned off, use an adjustable wrench to turn it clockwise about a quarter to half turn — no more. Turn the water back on and check. Compressing existing packing tighter around the stem stops a surprising number of leaks without any parts at all. If it still weeps, or if the nut is already tight, it’s time to repack.
One caution: don’t crank the nut so hard the handle becomes stiff to turn. If the handle grinds or squeaks after tightening, you’ve over-compressed the packing and it’ll fail faster. Snug, not gorilla-tight.
If your handle leak comes with the faucet refusing to shut off entirely, that’s a different, more urgent situation — worn packing plus a failed seat washer or a stripped stem. We walk through that emergency in our guide on why an outside faucet won’t turn off and how to stop the water fast, which is worth reading before you start disassembling anything under pressure.
How do you replace outdoor faucet packing yourself (step by step)?
You replace outdoor faucet packing by shutting off the water, removing the handle and packing nut, pulling the stem, wrapping fresh graphite string (or fitting a new washer/O-ring) around the stem, and reassembling. Start to finish it takes 10–15 minutes and one adjustable wrench.
Here’s the full sequence:
- Shut off the water supply to that faucet. For a standard sillcock, close the interior shutoff valve on the pipe feeding it. Then open the outdoor faucet to relieve pressure and drain it.
- Remove the handle. Unscrew the screw in the center of the handle and pull it straight off the stem.
- Loosen the packing nut with an adjustable wrench (counterclockwise) and unthread it fully.
- Unthread and pull out the valve stem. You may need to reinstall the handle temporarily and turn it counterclockwise to back the stem out of the body.
- Inspect and remove the old packing. Scrape off crumbled graphite string, or slide off the old washer/O-ring. Clean the stem with a rag so the new seal grips clean metal.
- Add new packing. For string: wrap 2–3 snug wraps of graphite packing around the stem just below the nut area, in the direction the nut tightens. For a washer or O-ring: seat the correctly sized replacement in its groove.
- Reassemble. Reinsert the stem, thread on the packing nut and snug it (quarter-turn past hand-tight), reattach the handle.
- Restore water and test. Turn the supply back on, run the faucet, and check the handle area. If it weeps slightly, tighten the packing nut another eighth-turn.
While you have the stem out, look at the seat washer at the bottom. If it’s flattened, cracked, or grooved, replace it too — it costs pennies and it’s silly to reassemble everything only to have the spout drip a week later. This is also the perfect moment to swap a worn handle; our complete guide to outdoor faucet handle replacement types shows how to match a new handle to your stem’s broaching so it doesn’t slip.
Should you tighten the packing, replace it, or replace the whole faucet?
Tighten first, replace the packing if tightening doesn’t hold, and replace the whole faucet only if the body is corroded, cracked, or freeze-damaged. Most handle leaks never get past step one or two.
Use this quick decision framework:
| Symptom | Most likely cause | Fix |
|---|---|---|
| Slight weep at handle, only when on | Slightly loose or compressed packing | Tighten packing nut ¼ turn |
| Steady leak at handle after tightening | Worn-out packing | Repack the stem |
| Drip from spout when off | Failed seat washer | Replace bibb washer |
| Leak from the pipe/wall or split body | Frozen and cracked faucet | Replace the whole sillcock |
| Handle spins freely, no shutoff | Stripped stem or seat | Replace stem or faucet |
The one situation where you shouldn’t waste time on packing is freeze damage. If your faucet leaked immediately after a hard winter — especially if water appears inside the wall or the body has a hairline split — the pipe or valve body likely cracked from ice expansion. No amount of new packing fixes a cracked casting. If you suspect this, read our breakdown of whether a dripping outdoor faucet that’s frozen solid is a real emergency so you can rule out a burst pipe before it floods a wall cavity.
What kind of outdoor faucet won’t leak around the handle in the first place?
A frost-proof sillcock with a modern O-ring stem seal — or a quarter-turn ceramic-disc hose bib — is far less likely to develop handle leaks than an old-school compression faucet with graphite packing. If you’re buying new, that’s the upgrade to make.
Here’s the practical difference. Traditional compression sillcocks rely on packing that physically wears every time you turn the handle, so leaks are a “when,” not an “if.” Newer designs solve this two ways:
- Frost-proof sillcocks place the shutoff valve 6–12 inches back inside the heated wall, so water drains out of the exposed section after each use and can’t freeze. Many use a captured O-ring stem seal that lasts far longer than string packing.
- Quarter-turn ceramic-disc hose bibs replace the compression stem entirely. A 90° flip opens and closes them, there’s no packing to grind down, and they seal reliably for years.
When shopping, match the stem length of a frost-proof sillcock to your wall thickness — a 6-inch model in a 12-inch wall will still freeze because the valve sits in the cold zone. Also confirm the connection type (MIP or sweat) and whether it includes a built-in vacuum breaker, which most codes now require to keep hose water from siphoning back into your drinking supply.
If your outdoor setup is really a shower or a wash station rather than a simple hose bib, the buying criteria shift toward valve durability and finish protection. Our roundup of the best external shower faucet for an outdoor or exposed-wall install in 2026 covers weather-rated finishes and freeze protection for those exposed applications.
What tools and parts do you actually need to keep on hand?
You need almost nothing: an adjustable wrench, a screwdriver, and a small kit of packing materials. Keeping these on a shelf means the next handle leak is a five-minute annoyance instead of a weekend project.
A sensible outdoor-faucet repair stash:
- Adjustable (crescent) wrench, 8-inch
- Flathead and Phillips screwdrivers
- A roll of graphite packing string (fits virtually any stem)
- An assortment of stem O-rings and bibb (seat) washers
- Plumber’s grease to lubricate the stem and O-rings
- Pipe-thread tape for reassembling threaded connections
Graphite packing string is the MVP here because it’s universal — one $5 roll repacks any compression faucet in the house, indoors or out. Pre-formed washers and O-rings are cleaner and quicker if you have the exact size, which is why an assortment pack is worth the couple of extra dollars.
Author note & why trust this guide
This article was written by the evefaucet product team, which designs and stress-tests hose bibs, sillcocks, and indoor faucets for residential use. Our outdoor valves are cycle-tested to simulate years of handle turns and pressure-tested against standard supply pressures, and our faucet bodies are built to meet lead-free drinking-water requirements (NSF/ANSI 372) with vacuum-breaker options that satisfy modern plumbing codes. Every faucet we sell is backed by a limited warranty covering the valve mechanism and finish. We’ve spent years reading the same “why is my spigot leaking around the handle?” questions from customers — this guide is the answer we wish everyone had before they bought the wrong part.
FAQ
Is graphite packing string better than O-rings for an outdoor faucet?
For older compression faucets with a packing nut, graphite string is the better choice because it fits any stem diameter and self-lubricates as you turn the handle. For newer frost-proof or cartridge sillcocks that were designed around an O-ring groove, use the correct O-ring — string won’t seat properly in those. Match the packing to how your faucet was built.
How tight should the packing nut be on an outdoor faucet?
Snug plus about a quarter-turn — just enough to stop the leak while the handle still turns smoothly. If the handle becomes stiff or squeaky, you’ve over-tightened and crushed the packing, which shortens its life. If it still weeps at hand-tight, add packing rather than forcing the nut harder.
Can I replace outdoor faucet packing without shutting off the water?
No. You must shut off the supply and drain the faucet first. The packing sits on the pressurized valve stem; removing the packing nut with water on will spray a high-pressure stream and can eject the stem. Always close the interior shutoff, open the spigot to relieve pressure, then work.
Why does my outdoor faucet only leak around the handle when the hose is running?
When you open the faucet, water pressure reaches the section around the valve stem, and worn packing can’t hold it back — so it escapes past the handle. When the faucet is off, that upstream section isn’t pressurized, so the leak stops. This on-only handle leak is the classic signature of failed packing, not a bad seat washer.
How long does outdoor faucet packing last?
Graphite string packing typically lasts 8–15 years depending on how often the faucet is used and how much sun and freeze-thaw exposure it gets. O-ring stem seals on modern frost-proof sillcocks often last longer. Over-tightening the packing nut and heavy daily use are the two biggest factors that cut that lifespan short.
Do I need to replace the seat washer when I repack the stem?
Not always, but you should inspect it while the stem is out. If the seat (bibb) washer is flattened, cracked, or grooved, replace it — it’s a few cents and prevents a spout drip right after your repair. If it looks clean and pliable, leave it. Doing both seals at once means one disassembly instead of two.